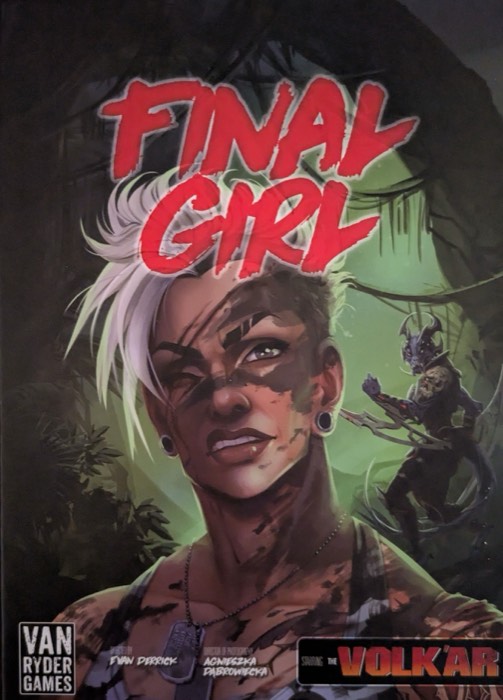
Box · S4·F4 · 52 games
The Green Terror 76.9% win rate
🇪🇸 ES · 🇬🇧 EN · 🇫🇷 FR · 🇩🇪 DE · 🇮🇹 IT
📖 Volk'ar guide (killer) · Pesadilla Verde guide (location)
Volk'ar on Pesadilla Verde. Across 52 recorded games it is won 76.9% of the time, 11.4 points above the game average (65.5%).
Small sample
Only 52 recorded games. Split across Dark Powers, Finales and Setups, each breakdown ends up with very few: take them as a hint, not a fact.
What makes it different
Hidden movement: Volk'ar is off the board, moving along a Path of Movement cards. The eye  adds a card faceup (you know where she goes); the crossed-out eye
 adds it facedown. She comes out with the Reveal icon
 , with the 6th Path card, or when you damage her. Attack the wrong space and she ambushes you. The only hidden-movement killer in the game, very tense. But the community warns: hidden movement adds to an already complex loop, and the board is hard to read. One of the most rules-demanding.
| Level | Expert |
| The map | River system, trainable soldier victims |
How Volk'ar works
- Its main mechanic is hidden movement: its meeple is not placed; Origin markers and facedown Movement cards are used instead.
- You attack the Path (potential movement), and its location is revealed only if the attack deals damage.
- Uses Track Action cards in the Action Tableau and the Attack Resolution card.
Summarised from the Final Girl Wiki page (CC BY-SA).
The map: Pesadilla Verde
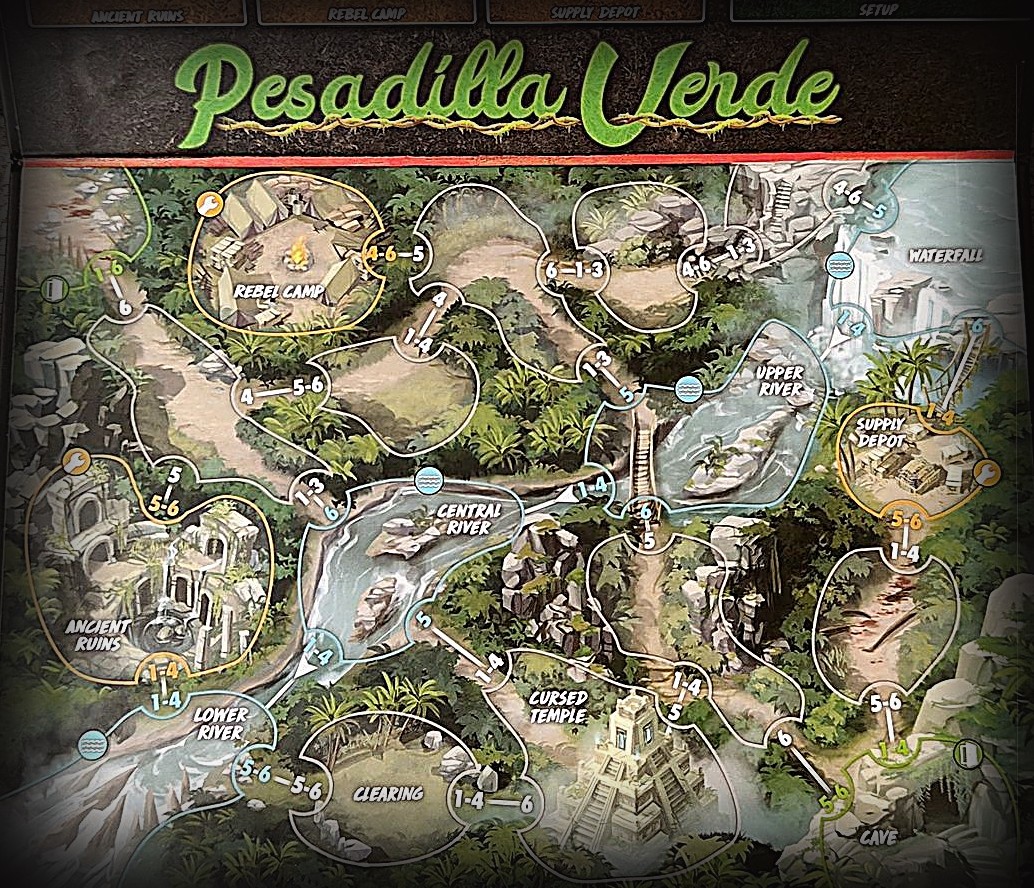
18 spaces and 2 exits (northwest and southeast, the Cave). Search spaces: Ancient Ruins, Rebel Camp and Supply Depot; other named spaces: Waterfall, Upper River, Central River, Lower River (these four form the River), Cursed Temple, Clearing and Cave.
- The Huey token's space is an Exit: there you can save any number of Victims, then the Huey is removed, revealing the Clearing, which is not an Exit.
- The Huey cannot be used again unless a game effect returns it to the board.
- River: travelling downriver (Waterfall > Upper > Central > Lower River) you can move as far as you want for one space of movement.
- Soldiers: every normal Victim is a Soldier; they act like Victims but will follow you into the Killer's space and can be given orders.
Unique cards: Huey token
Summarised from the Final Girl Wiki page (CC BY-SA).
The killer
Volk'ar has a 73.4% win rate across all maps, over 109 games. Here, on Pesadilla Verde, the figure is 76.9%.
Setups
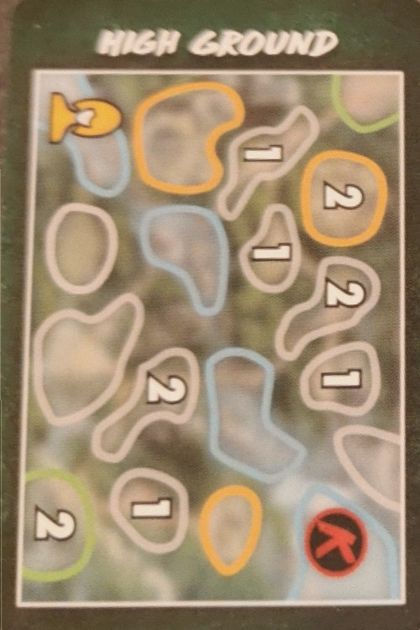
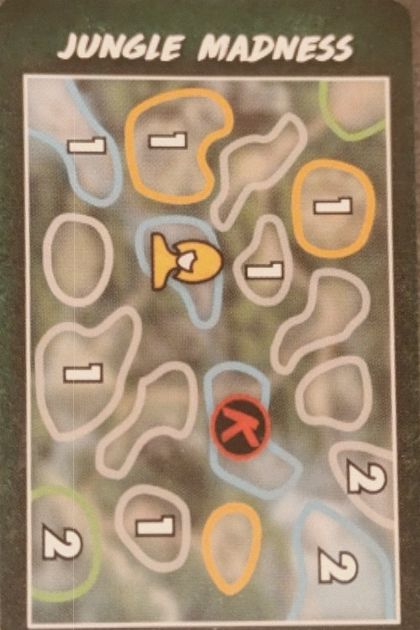
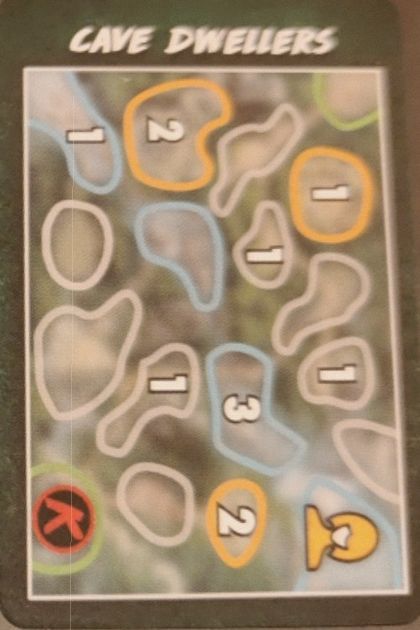
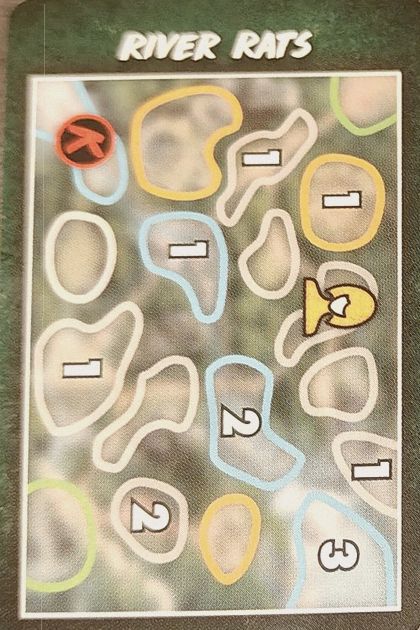
From the hardest to the easiest. At least 20 games.
| Setup | Win rate | Games |
|---|---|---|
| River Rats | 70.0% | 20 |
| Jungle Madness | 73.9% | 23 |
| High Ground | 80.0% | 25 |
| Rebel Yell | 82.6% | 23 |
| Cave Dwellers | 90.9% | 22 |
Between River Rats and Cave Dwellers there are 21 points of difference. The starting setup matters more than it looks.
Dark Powers
| Dark Power | Win rate | Games |
|---|---|---|
| Blades in the Dark | 70.4% | 27 |
| Chameleon of Death | 77.8% | 27 |
| Stress of the Unknown | 78.4% | 37 |
Finale cards
| Finale card | Win rate | Games |
|---|---|---|
| Self Destruct | 56.8% | 37 |
| Unrevealed | 60.0% | 20 |
| Rampage | 88.5% | 26 |
Where to get it
Affiliate links: if you buy, I get a small commission at no extra cost to you. It doesn't change what the data above says.
How to start the game
The four openings, with which one to use depending on the setup, are in the opening strategies.
📖 Volk'ar guide (killer)
Works with any location. ↑ top · Volk'ar page → · Pesadilla Verde guide (location)
= faceup card to the Path · = facedown card · = Reveal · ⌛ = Time · ✴ = damage · ❤️ = recover health · 💔 = lose health ·  = raise Horror · ⊘ = lower Horror · 🎲 = die · 🔧 = space with the orange wrench icon · 🩸 = Bloodlust
Killer phase
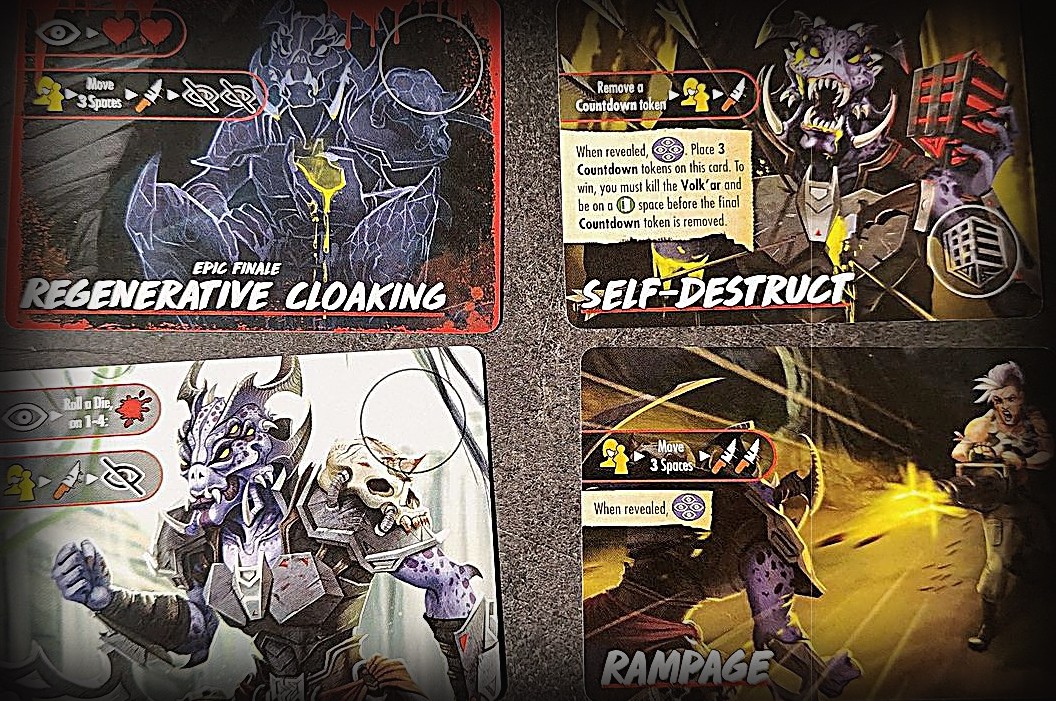
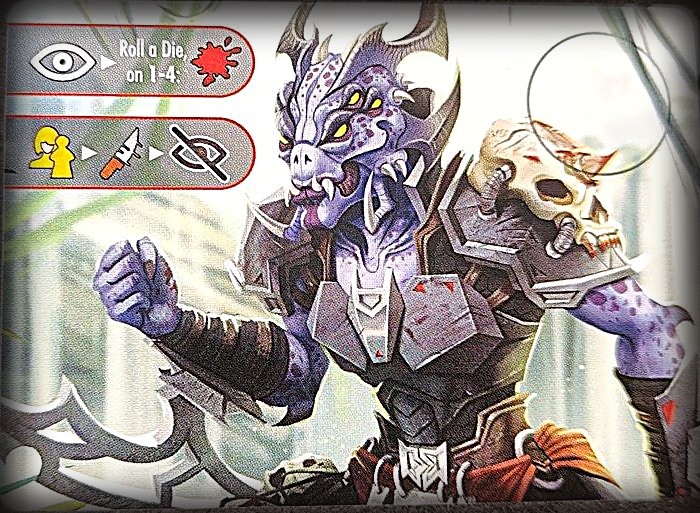
- If the phase starts with her concealed, top row: a face-up Movement card to the Path (the eye ) ▸ roll a 🎲: on 1-4, +🩸.
- If it starts with her visible, bottom row: targets you or the closest Victim ▸ attacks ▸ conceals (the crossed-out eye ).
- Draw and resolve a Terror card.
Watch out
- If you attack her while Concealed and she isn't in the space you attacked, she ambushes you (even if someone else attacked): you suffer the Ambush Penalty on the last card of her Path.
- You are never allowed to look through the discarded Movement cards.
Special setup
- Place the Track Action cards into the Action Tableau.
- Place the Attack Resolution card, the Damage tokens and the Attack token (the crosshair) next to the play area.
- Shuffle the Movement cards and place the deck facedown next to the board. Deal 1 card facedown next to it, leaving room for up to 5 more.
- After revealing the Setup card, do not place Volk'ar on the board: her meeple goes on the back of the Finale card, in the marked space. Place an Origin marker where the Killer would begin and the other on that facedown Movement card.
Concealed or Visible
- Volk'ar has no Movement Value: she moves along her Path, the row of Movement cards.
- Concealed: she can't be seen, but she's ALWAYS in some space, the one her Path points to. Her meeple is on the Finale card. If she's Concealed at the start of the Killer phase, resolve the upper Killer Action on the Finale.
- Visible: her meeple is on the board and she's seen normally. If she's Visible at the start of the Killer phase, resolve the lower Killer Action.
- The Origin card is the first card in the Path (it has an Origin marker on it) and shows where she starts her hidden movement.
Building the Path
- With the eye icon, draw a Movement card and place it faceup in the next spot of the Path. With the crossed-out eye , place it facedown.
- If she's Visible when a crossed-out eye is resolved, she becomes Concealed right away: put one Origin on the new card and the other in her current space, and her meeple goes back to the Finale card.
- If the deck runs out, shuffle the discards into a new deck.
When she comes out
- She resolves her Path and reveals herself when: you resolve the Reveal icon on a card, a 6th card is added to the Path, or you damage her while Concealed (see below).
- If the 6th card arrives while resolving the Finale's Killer Action or a Terror (or other) card, finish that card first. There may be more than 6 cards to resolve.
- When revealed: 1) place her meeple in the Origin marker's space (even if it's no longer accessible) and put both Origins next to the deck. 2) Starting from the Origin card, resolve each card in the Path one at a time, flipping it if needed: she moves, and attacks where she is if the card says so. Killer movement restrictions apply to her, and sometimes she won't move. 3) If you or she must reveal the Final Health token, wait until all cards are resolved. 4) Discard the Path cards.
Attacking her while Concealed
- You may target any space in range as if she were there. Place the Attack token there, resolve the attack and track the damage with Damage tokens on the Attack Resolution card.
- If you deal no damage, she stays Concealed and the Path isn't resolved. If you deal damage, her Path is resolved.
- If she ends in the space with your Attack token, she takes the damage! If she ends elsewhere, the attack had no effect and she ambushes you: resolve the Ambush Penalty, the red band at the bottom of the last card in her Path.
- Afterwards, discard the Damage tokens and remove the Attack token.
- If you attacked your own space, she ends there and the last card has a Killer Attack line, both attacks happen simultaneously.
While she is Concealed
- If an effect asks you to place something or count spaces relative to the Killer, use the Origin marker's space.
- If an effect asks you to place the Killer, ignore it.
- If a card has a Killer Action line, treat it as a crossed-out eye .
- Victims don't panic during the Panic phase.
Tracking her
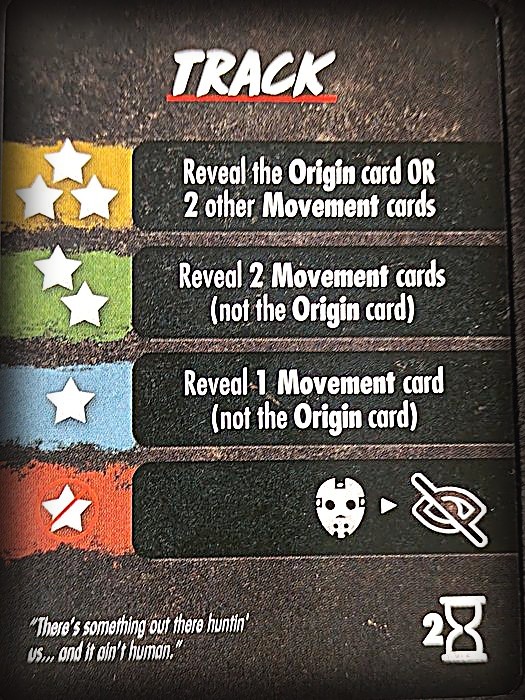
- The Track Action card (2 ⌛) flips Path cards: with 3★ reveal the Origin card or 2 other cards; with 2★, 2 cards (not the Origin); with 1★, 1 card (not the Origin). The red row: Volk'ar ▸ crossed-out eye .
- If every card in the Path is faceup you know exactly where she is. If any is facedown, you have to guess.
Her Movement cards
- The deck has 22, with repeats. Each says how she moves; some have an attack line (🎯 Final Girl or Victim ▸ 🔪) and the red band at the bottom is the Ambush Penalty. None counts the space she's already in. The different ones we've seen:
- 2 spaces towards the closest 🔧 space (ties: alphabetical) · attack · ambush
- 1 space towards the closest 🔧 space (ties: reverse alphabetical) · ambush 2 ⌛
- 3 spaces towards the closest 🔧 space (ties: reverse alphabetical) · attack · ambush 2 blood splatters
- 2 spaces towards the closest Named space (ties: reverse alphabetical) · ambush 1 blood splatter
- 1 space towards the closest Named space (ties: alphabetical) · attack · ambush
- 3 spaces towards the closest green-icon space (ties: lowest panic number) · ambush 1 blood splatter
- 2 spaces towards the closest green-icon space (ties: highest panic number) · attack 🔪🔪 · ambush
- 1 space towards the closest green-icon space (ties: lowest panic number) · attack · ambush 3 ⌛
- Move 1 space on a ①, ② or ③ (six cards, with or without attack) · ambushes: , , 2 ⌛, 3 ⌛ or blood splatters
- Do not move and recover ❤️ (two cards) · ambush or discard a random Action card
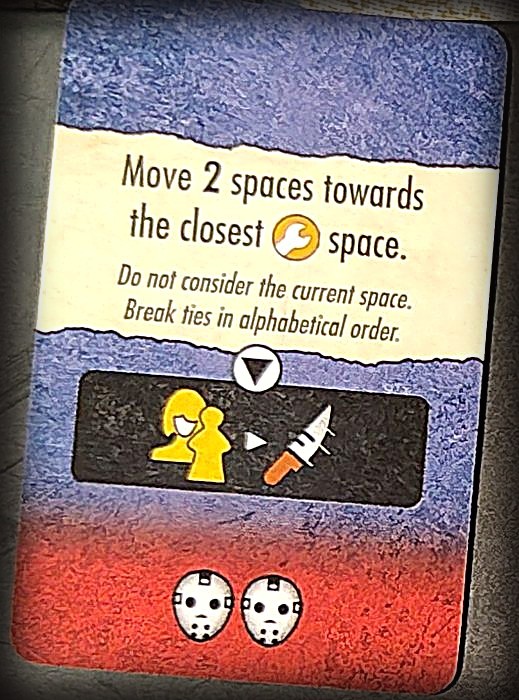
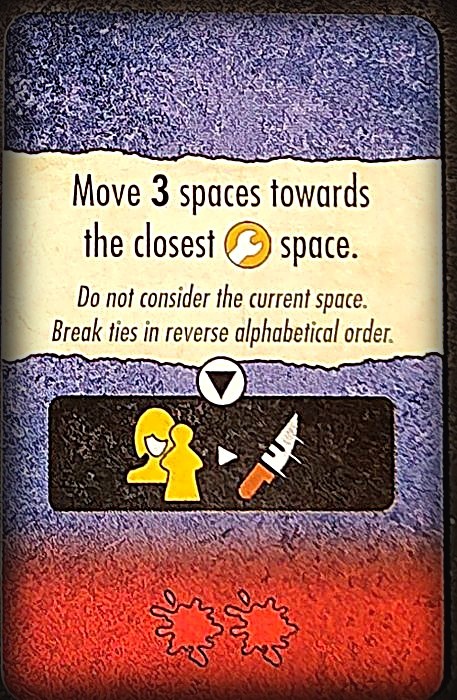
Finales
- Top row is for when she's Concealed, bottom row for when she's Visible.
- Base Finale: Concealed, (faceup card to the Path) and roll a die: on 1-4, +🩸. Visible, targets you or the closest Victim, attacks and conceals (crossed-out eye ).
- Rampage: targets you or a Victim, moves 3 and attacks twice. When revealed, Volk'ar is revealed (Reveal icon).
- Self-Destruct: remove a Countdown token, targets you and attacks. When revealed, Volk'ar is revealed and you place 3 Countdown tokens on the card. To win you must kill Volk'ar and be on an exit space before the last one is removed.
- Regenerative Cloaking (Epic Finale): Concealed, and recovers ❤️❤️. Visible, targets you or a Victim, moves 3, attacks and adds two hidden cards (two crossed-out eyes ).
Dark Powers
- Blades in the Dark: when her Path is resolved, kill 1 Victim in each space adjacent to her final space.
- Chameleon of Death: when she's attacked while Concealed and takes no damage, you take ✴ equal to her Attack Value.
- Stress of the Unknown: the first time each turn you resolve the crossed-out eye , lose 2 ⌛.
- Merciless Ambush (Epic Dark Power): when her Path is resolved, resolve the Ambush Penalty on each Movement card, not just the last.
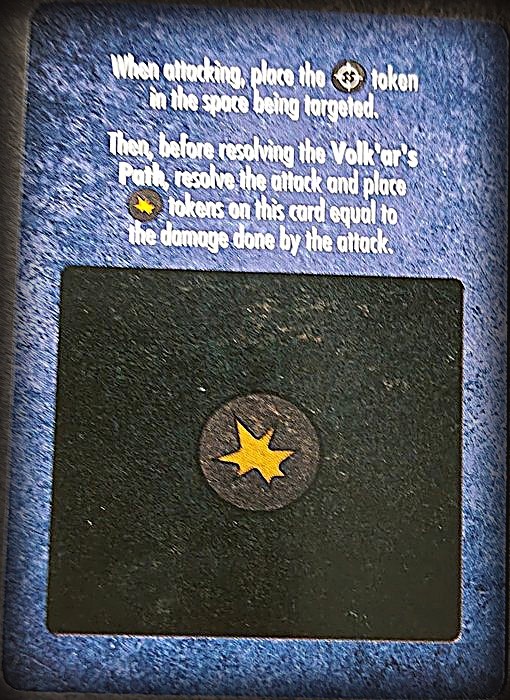
Attack Resolution card
- When attacking, place the Attack token in the space being targeted.
- Then, before resolving her Path, resolve the attack and place Damage tokens on this card equal to the damage done.
Terror cards (and what their icons mean)
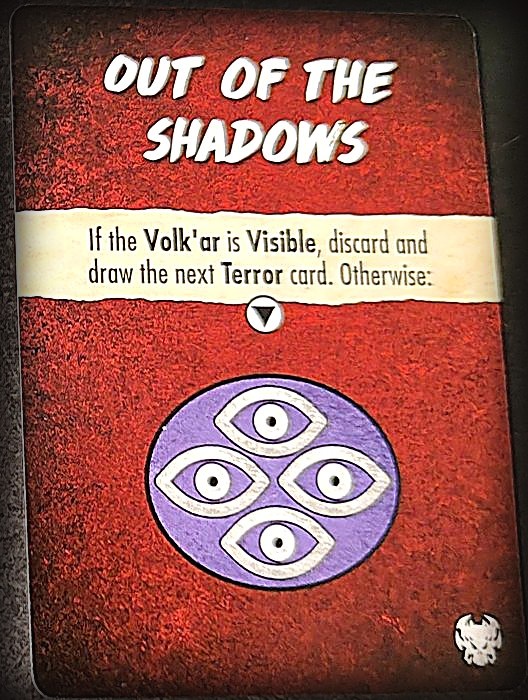
- Remember: eye = Movement card faceup to the Path (you know where she's going); crossed-out eye = card facedown (you don't); the 4 purple eyes = Reveal , she comes out and resolves her whole Path.
- Sneak: and crossed-out eye . Horror goes up and she hides one more step.
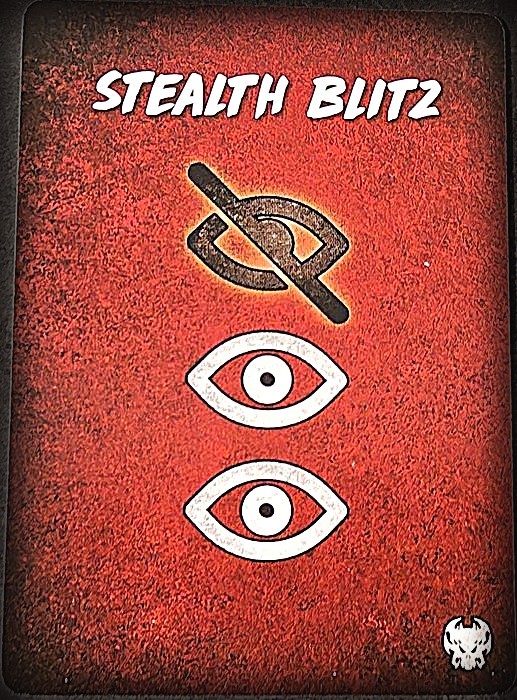
- Stealth Blitz: eye , eye , crossed-out eye . Adds 3 cards to the Path at once: if she already had several, it can reach the 6th and bring her out.
- Out of the Shadows: if she's already Visible, discard and draw the next Terror card. Otherwise, Reveal : she comes out now.
- Psy Ops: if she's Visible, discard and draw another. Otherwise, discard all Track Action cards in your hand, then and eye . It leaves you with no way to track her.
- Bait 'n Switch: if the Origin card is faceup, flip it facedown. Shuffle the other Movement cards in the Path and return them facedown. Then . Everything you had tracked is lost.
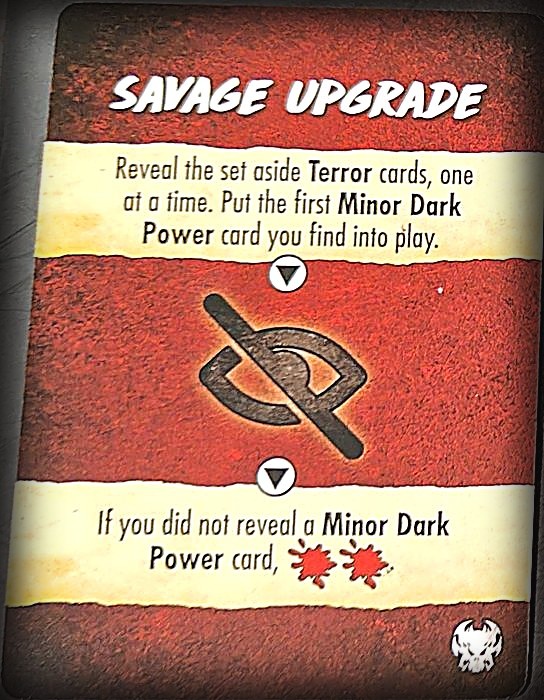
- Savage Upgrade: reveal the set-aside Terror cards one at a time and put the first Minor Dark Power you find into play. Then crossed-out eye . If you didn't reveal a Minor Dark Power, +🩸🩸.
- Energy Shield (Minor): when revealed, place a ❤️ on it. The first time the crossed-out eye is resolved each turn, add 1 ❤️ to it. ❤️ can't be added any other way. Discard it when there are no ❤️ on it.
- Collector (Minor): each time her Path is resolved, first take the top Item card from the closest 🔧 space and place it underneath this card. When Collector is discarded, all collected Items form a new Item deck next to the board and the Collection token goes in Volk'ar's current space: that space may now be searched.
- Evasion (Minor): whenever you resolve the crossed-out eye , resolve it a second time.
📖 Pesadilla Verde guide (location)
Works with any killer. ↑ top · Volk'ar guide (killer)
Watch out
- Soldiers follow you into the Killer's space, unlike normal Victims.
- At the start, saving a Soldier costs 2 ⌛ and a lone Soldier deals no damage.
- No one can move upriver, against the arrows.
Special setup
- Place the Huey token in the Clearing.
- Place the Train Action cards into the Action Tableau.
- Place the Soldiers card and the Action cubes next to the play area. Put the 8 Upgrade tokens on it: the 2 starting ones (green star) Unlocked side up and the other 6 Locked side up (padlock).
The Soldiers
- Every normal Victim is a Soldier. They act like normal Victims for almost everything, but they follow you into the Killer's space and can be given orders.
- The Archeologist and the Rebel Leader are not Soldiers and can't be ordered.
Upgrades
- There are Action Upgrades (tokens with squares) and Ability Upgrades (no squares). At the start Soldiers only have two Action ones: moving and attacking. The Train Action card unlocks more.
- To Unlock: pick a token and flip it from the padlock to its Unlocked side. If an effect says to Lock one, flip it back.
- Attack (you start with one Unlocked and one Locked): a Soldier or group attacks Enemies within their range.
- Move (same, one and one): a group of Soldiers moves 1 space.
- Saving Soldiers: they don't want to be rescued, they want to fight. Saving one costs 2 ⌛; Unlocked, it costs no Time.
- Friendly Fire: whenever they attack, roll a die for each Soldier involved. On a 1-2 one of them dies. Unlocked, no more friendly fire.
- Attack Range: at the start they only attack their own space. Unlocked, also an adjacent one.
- Damage: at the start they deal ✴ equal to Soldiers ÷ 2, rounded down (one deals nothing, three deal 1). Unlocked, rounded up (one deals 1, three deal 2).
Ordering Soldiers
- During the Action phase: pick the space with the Soldiers, pick an Action Upgrade token and put a cube on its leftmost square, then resolve the Action for all Soldiers in that space.
- You can't use an Action if there's already a cube in its row.
- During Upkeep, move all cubes one square to the right. Once a cube leaves the last square it's available again.
Example: 3 Soldiers. Cube on Move (free): they move to the Upper River. Cube on Attack (free): with Damage unlocked they deal 2✴ (3÷2, rounded up). Friendly Fire is still on: roll 3 dice, 3, 5 and 6, nobody gets shot.
The Huey 
- The Huey's space counts as an exit space (the green icon). In the same space as the Huey you can save any number of Victims there.
- Then the Huey is removed and the Clearing stops being an exit. It only comes back if a game effect returns it.
The River 
- There are 4 River spaces: Waterfall, Upper River, Central River and Lower River.
- Downriver (following the arrows) you can reach any River space for 1 movement: Waterfall to Lower River with a single Walk success. You pass through the spaces in between and resolve their effects.
- Soldiers move this way too; Enemies don't: they only move downriver to an adjacent River space.
- No one (you, Victims or Enemies) can move upriver. The upriver space still counts as adjacent.
- The Wet Suit lets you move upriver, but Victims can't follow you.
From the Waterfall you can go to the Upper River (with the arrow). Not the other way.
Spaces
- Named: Lower, Central and Upper River, Waterfall, Rebel Camp, Ancient Ruins, Supply Depot, Cursed Temple, Clearing and Cave.
- The 🔧 spaces are Ancient Ruins, Rebel Camp and Supply Depot, each with its own Item deck on the side of the board.
Setups
K = Killer start · yellow figure = Final Girl · numbers = Victims in each space.
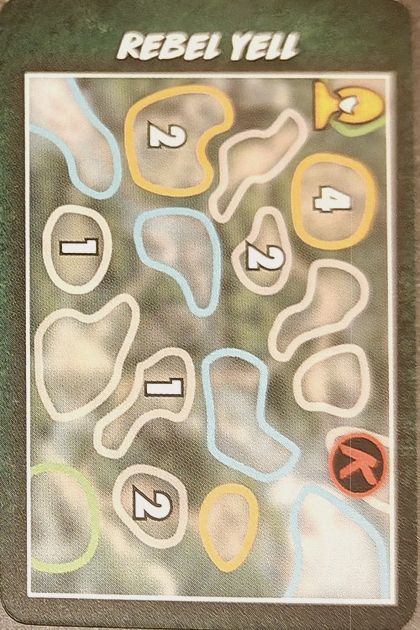
Items
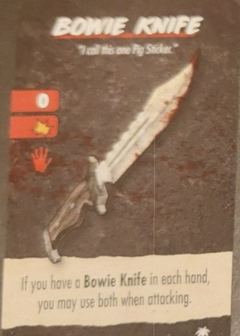
Weapon · range 0 · 1 ✴ · 1 hand. If you have a Bowie Knife in each hand, you may use both when attacking.
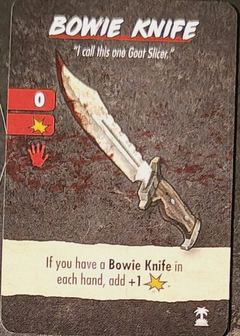
Weapon · range 0 · 1 ✴ · 1 hand. If you have a Bowie Knife in each hand, +1 ✴.
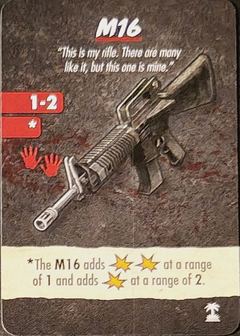
Weapon · range 1-2 · 2 hands. Deals 2 ✴ at range 1 and 1 ✴ at range 2.
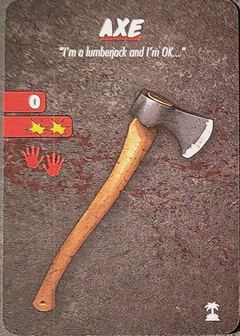
Weapon · range 0 · 2 ✴ · 2 hands.
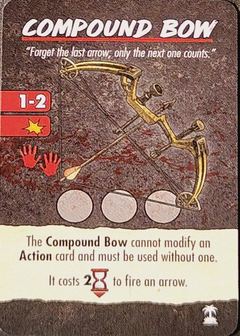
Weapon · range 1-2 · 1 ✴ · 2 hands · 3 arrows. Can't modify an Action card and must be used without one. Firing an arrow costs 2 ⌛.
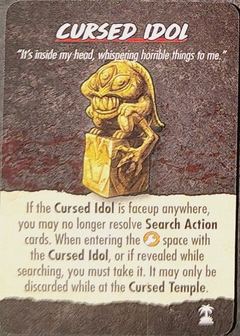
While it's faceup anywhere, you may no longer resolve Search Action cards. When entering the 🔧 space with the Idol, or if revealed while searching, you must take it. It may only be discarded at the Cursed Temple.
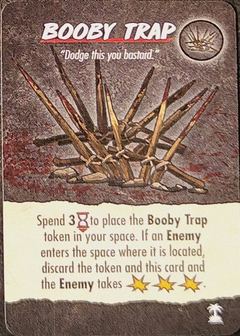
Spend 3 ⌛ to place the Booby Trap token in your space. If an Enemy enters that space, discard the token and this card, and the Enemy takes 3 ✴.
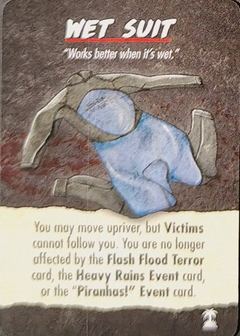
You may move upriver, but Victims can't follow you. You're no longer affected by the Flash Flood Terror card, the Heavy Rains Event or the "Piranhas!" Event.
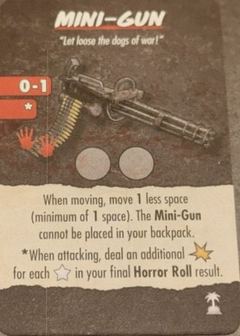
Weapon · range 0-1 · 2 hands · 2 uses. When moving, move 1 less space (minimum 1). Can't go in your backpack. When attacking, deal 1 extra ✴ for each ★ in your final Horror Roll.
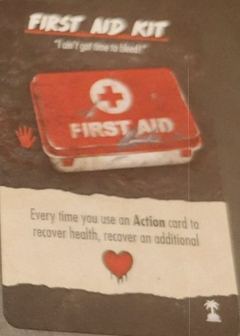
1 hand. Every time you use an Action card to recover health, recover ❤️ one more.
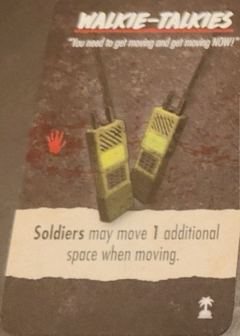
1 hand. Soldiers may move 1 additional space when moving.
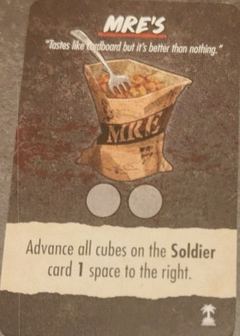
2 uses. Advance all cubes on the Soldier card 1 space to the right.
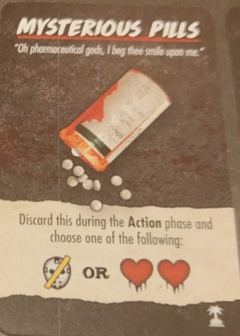
Discard during the Action phase and choose: ⊘ or ❤️❤️.
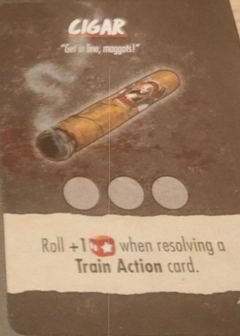
3 uses. Roll 1 extra 🎲 when resolving a Train Action card.
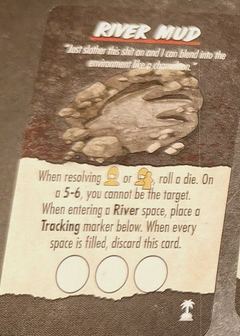
When resolving the Target Final Girl or Target Victim/Final Girl icon, roll a die: on 5-6 you can't be the target. When entering a River space, place a Tracking marker on the card. When all 3 spaces are filled, discard it.
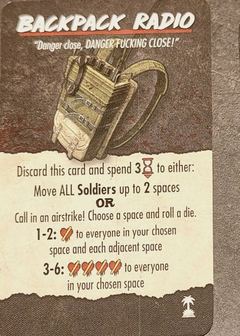
Discard and spend 3 ⌛ to either: move all Soldiers up to 2 spaces, or call in an airstrike: choose a space and roll a die. 1-2: 💔 to everyone in that space and each adjacent one. 3-6: 💔💔💔💔 to everyone in that space.
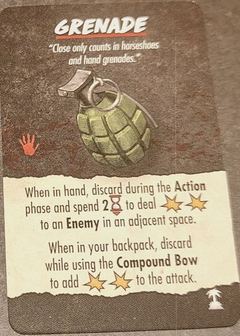
1 hand. In hand: discard during the Action phase and spend 2 ⌛ to deal 2 ✴ to an Enemy in an adjacent space. In your backpack: discard while using the Compound Bow to add 2 ✴ to the attack.
There are 2 Grenades and 2 different Bowie Knives.
Pesadilla Verde events
- Supply Drop
- Take 3 random unused Items and place them faceup next to the Supply Depot Item deck. When you search there successfully, you may take one of them instead of drawing. Discard when none of the 3 are left.
- "Piranhas!"
- Roll a die and place the Piranhas token: 1-2 Lower River, 3-4 Central River, 5-6 Upper River. Everyone in that space: 💔. Anyone entering it later: 💔.
- "Get to the Choppa!"
- If the Huey token isn't on the board, place it in the Clearing. For each Victim saved with the Huey, choose: ❤️❤️, 3 ⌛, ⊘ or take an Action card (max 2 ⌛). Discard when the Huey token is removed.
- Heavy Rains
- Unless you're moving from a River space, entering a River space costs 2 ⌛.
- Twitchy Soldiers
- If you've Unlocked the "No Friendly Fire" Upgrade, Lock it now. When rolling for friendly fire, Soldiers are killed on 1-3. Discard if "No Friendly Fire" is Unlocked.
- Rebel Raiding Party
- Roll a die: 1-3 Ancient Ruins, 4-6 Supply Depot. Take all Items at that space, shuffle them facedown and put them at the bottom of the Rebel Camp Item deck. Discard.
- Cursed Temple
- Place the Cursed token at the Cursed Temple. When you enter the Cursed Temple: 💔💔💔, then discard the token (and the card).
- Sgt. Weathers
- Place him in the space with the most Victims. He counts as a Soldier. When ordered, he and any Victims with him may move 1 extra space and add +1 to their attack range. Killed: .
- Rebel Leader
- Place him at the Rebel Camp. In Upkeep he moves 1 space toward the nearest Victim who is not at the Rebel Camp, then moves 1 Victim from his space to the Rebel Camp. Soldiers at the Rebel Camp can't be ordered to take Actions. He won't follow you.
- Archeologist
- Roll a die and place him: 1-2 Ancient Ruins, 3-4 Rebel Camp, 5-6 Supply Depot. Roll 1 fewer 🎲 when searching in his space unless you pay 3 ⌛. Resolve again each Upkeep.
Our own wording, based on the rulebook, the cards and the wiki. Spot a mistake? Let us know.
